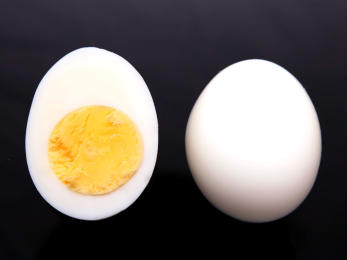
For years I struggled with making hard boiled eggs for any of my dishes which call for them. I could never
get it right. I cooked them for too long or too short a time. They would always have that blue-green color
around the hard boiled yolk, which indicates that they
were cooked for too long. The yolks were pale and
weak looking. They were so difficult to peel that
much of the white was broken and lost when the
shell refused to part with the egg white.
Not anymore! Here is the secret to preparing any
number of perfect hard boiled eggs.
The idea here is to better control the cooking time by arresting the cooking with the cold water. If you time
it right, there will be no telltale blue-green color bordering your yolks and the yolks themselves will be an
appetizing bright yellow color. Plus they will peel with ease!
1. Furiously boil enough water to cover all the eggs, without putting the eggs in yet.
2. Add the eggs gently – I use a slotted spoon to lower in two at a time. No worries if a few eggs crack
and leak when they hit the hot water; they can be salvaged.
3. Leave them boiling furiously for exactly 12 minutes, no more and no less.
4. At 12 minutes, carefully pour just the boiling water out and quickly add cold water to cover the eggs.
6. Pour out the water again if your cold water turned warm/hot when it hits the eggs & pan; fill with cold
water again.
7. Cool and peel perfect hard boiled eggs by tapping the shells on the edge of the sink and peeling them
under running cold water to wash away little bits of shell.

How to Cook Perfect Hard Boiled Eggs
Home | Indian Recipes | Thai Recipes | Main Dishes | Desserts | Leave a Comment | Recipes by Email | About
Copyright © Suzanne’s Recipe File | Privacy Policy


- Artichoke Dip
- Baked Brie
- Chili Con Queso
- Sliders!
- Buffalo Chicken Dip
- Salsa Fresca
- Cheese Ball
- Hard Boiled-Deviled Eggs
- Mandarin Orange Salad
- Chicken Wings
- Black Bean Salad
- Chopped Brocoli Salad
- Brussels Sprouts Salad
- Dewey's Citrus Salad Dressing
- Sweet and Sour Salad Dressing
- Vinaigrette Salad Dressing
- Blue Cheese Vinaigrette
- Russian Salad Dressing
- Reuben Loaf


►Home
►Appetizers &
Salads
►Baked Brie
►Sliders!
►Cheese Ball
►Salsa Fresca
►Artichoke Dip
►Buffalo Chicken
Dip
►Chili Con Queso
Dip
►Chicken Wings
►Chopped Broccoli
Salad
►Dewey’s Citrus
Salad Dressing
►Sweet and Sour
Dressing
►Blue Cheese
Vinaigrette Dressing
►Brusels Sprouts
Salad
►Russian Dressing
►Chuck’s Vinaigrette
Dressing
►Black Bean Salad
►Hard Boiled -
Deviled Eggs
►Salad with
Oranges
►Get Recipes by
Email