Mushroom Tart - All Purpose Galette
Home | Indian Recipes | Thai Recipes | Main Dishes | Desserts | Leave a Comment | Recipes by Email | About
Copyright © Suzanne’s Recipe File | Privacy Policy

►Home- All Recipes
►Side Dish
Recipes
►Potato Salad
►Mushroom Tart -
Galette
►Cole Slaw
►Roasted
Vegetables
►Roasted Brussels
Sprouts
►Roasted Grapes
and Sausage
►Baked Rice with
Pomegranate
Relish
►Corn Pudding
►Corn Bread
►Bagels
►Parsnip Puree
►Mashed Potatoes
►Sweet Potato
Casserole
►Mashed Cauliflower
►Baked Potatoes
►Glazed Carrots
►Cranberry Sauce
►Irish Soda Bread
►Sauteed Squash
►Green Bean
Casserole
►Gravy
►Stuffing
►Leave a Comment
►Get Recipes by
Email
I have long used frozen pie crusts to bake my holiday pies. From apple to pecan and pumpkin, my pie
fillings were all homemade but the crusts I trusted to Pillsbury. No more! At least as far as a single crusted tart
goes, anyway.
Enter the galette – a rustic flour, sugar and butter crust that practically makes itself. Fill it with mushrooms
or some fruit and you cannot go wrong.
Here is the recipe in three parts: One for the crust, one for a savory mushroom filling and one for a fruit
filling.
First the galette itself:
Dry ingredients:
2 cups all-purpose flour, and a bit extra for dusting
and rolling out
½ cup non-rising plain cornmeal
2 teaspoons sugar
1 teaspoon non-iodized salt
For cutting in:
2 sticks (16 tablespoons) unsalted butter, chilled
Wet ingredients:
¼ cup ice water
¼ cup sour cream or yogurt, chilled
Parchment paper for handling
Like with all pie crusts, it’s important to keep the dough chilled at all times, so when you are working with
the dough be sure to get it back to your refrigerator between steps so that it stays chilled. The
butter chunks need to stay cool so that they melt only when baked, helping the crust to stay light
and flaky.
Whisk together the dry ingredients; the flour, cornmeal, sugar and salt.
Leave the butter in your refrigerator until you are ready to take this step, helping to keep the
whole mess chilled. Slice all that butter into small pats and cut all of it into the dry ingredients.
You can use a pastry cutter or a pair of forks. You can use your hands, but work quickly. The
warmth from your hands will raise the temperature of the butter pats and the dough. Remember
that those butter chunks need to stay cool and not soften too much. You are done when the
dough appears like course gravel with small pea-sized bits of butter in it.
Stir the chilled sour cream or yogurt into the ice water then add the mixture to the dry
ingredients a little at a time until combined. Depending on your household humidity, age of the
flour, etc., you may have to add a little water than that ¼ cup to get the right consistency. You are
aiming for moistened dough that is not gluten-plastic-sticky like bread dough. But it definitely
should clump together well when you squeeze some in your fist.
Brief work counts in your favor: The finished dough needs to get back to that ‘fridge to cool, it
needs to rest a bit, and it will not be good to overwork the dough. These are all classic rules of
pastry making designed to turn out a deliciously flaky crust.
Form the dough into a ball and divide it in half. Cover one half with plastic wrap to prevent it
from drying out and get it into your refrigerator to keep it chilled. Keep it there for one hour or
overnight.
Throw the other half in your freezer for another time. You can keep it there for a couple of
months and defrost it overnight when needed.
After one hour or overnight, remove the half-dough and roll it out to about a 12-13 inch disk
that is about 1/8 inch thick. To roll out the disk, here is where the chilling pays off. A well-chilled
work surface sticks less to the dough. My quartz countertop works well for this since marble or
quartz stays cooler than wood. Before starting, throw a dusting of extra flour on the work surface
and on the rolling pin and on the dough.
This can actually be fun as you start in the middle of the disk and feel the dough squish out from the roller
in the direction you choose. When done, place the dough on a piece of parchment paper on a baking sheet
and get that disk back into the refrigerator to keep it chilled. Prepare your choice of filling.
Remember that the moisture boiled off from the chilled chunks of butter is responsible for air pockets in
this non-rising dough. Because they are chilled, the moisture/air is released at just the right time to ensure the
flakiness.
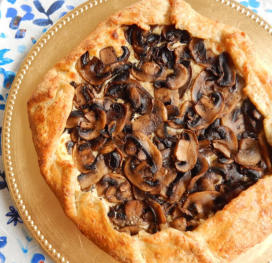
Savory Mushroom Ricotta Galette Filling
Cheese filling ingredients:
1 cup full fat ricotta cheese
¼ cup Gruyère or mozzarella cheese, coarsely grated
1-2 tablespoons chopped rosemary or thyme
Mushroom filling ingredients:
1 pound cremini, shitake or any combination of flavorful fungi
2-3 tablespoons olive oil or butter
2-3 cloves garlic, peeled and chopped fine
1-2 teaspoons chopped rosemary or thyme
Salt
2 tablespoons white wine or an 80-20 mix of water to lemon juice for deglazing
For the egg wash:
1 egg
1 tablespoon water, milk or cream
A little extra cheese for sprinkling over the egg wash
Preheat your over for 375 degrees.
Mix together all the cheeses and some of the rosemary/thyme and a little salt in a small bowl and set
aside.
Heat a little of the oil in a large pan on medium high heat and sauté the mushrooms to drive out their
moisture so the tart won’t get soggy. This will take about 10-12 minutes until the mushrooms just are starting
to brown.
Add the garlic plus rosemary/thyme and sauté some more until softened, then toss in your
wine/water/lemon juice to deglaze the pan. Wait until that liquid evaporates then scrape everything into a
separate bowl and reserve.
Remove the rolled out disk of dough from the refrigerator. Spread the ricotta mixture evenly
on the disk, leaving a 1 ½ - 2 inch margin at the edges. This base of ricotta really helps keep
everything moist during baking.
Layer the mushroom mixture on top of the ricotta leaving the same margin at the edges for
folding. Then fold the edges all in towards the center, pleating where needed, to finish the
assembly. No need to be perfect – this is the joy of a rustic tart like a galette.
Make an egg wash by whisking together the egg and water/milk and brush it all over the
edges of the galette. Sprinkle a little extra Gruyère or mozzarella on top of the wash for a
completely finished look. If you have an extra sprig of rosemary/thyme, throw that in the middle
and bake.
Bake at 375 degrees for 45-50 minutes until browned, let cool, and serve.
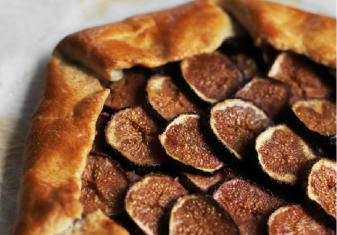
Alternate Filling – Honeyed Fig or other fruit
For the filling base:
3 tablespoons chopped nuts – I use pecans or walnuts
1 tablespoon + 1 ½ teaspoons flour
1 tablespoon sugar
Alternate filling base, which I will try next time (adapted from the mushroom filling):
¾ cup full fat ricotta cheese
¼ cup shredded Gruyere cheese, may substitute mozzarella which sacrifices flavor
Salt to taste
Optional chopped rosemary to taste
Glaze for the figs:
2 tablespoons honey
½ teaspoon vanilla extract
1 teaspoon orange zest – this is an awesome addition and cannot be omitted!
½ teaspoon non-iodized salt
10-12 ounces fresh figs, stems removed and cut in half. The larger figs need to be cut into thirds.
You want to end up with about 15-20 slices.
The egg wash and topping:
1 egg
1 tablespoon milk, cream or water
Some Turbinado sugar to sprinkle on top of the wash
Mix together the filling base (either the flour & nut or the ricotta & Gruyere) and set aside.
Make the glaze by warming the honey in a microwave safe bowl, then combine with the vanilla, orange
zest & salt. Add the figs, combine, and set them aside.
Roll out the galette dough as for the mushroom tart. Spread the filling base onto the rolled out dough
leaving a 2 inch border. Fold in the dough edges to make a 2 inch round margin.
Set the sliced figs in the center of the tart, cut side up, touching each other to fit them all in.
Brush the 2 inch crust edge with the egg wash and sprinkle some Turbinado sugar onto the wash.
Bake at 375 degrees for 40-50 minutes until done. Watch for over browning of the crust. Arrest the
browning with a foil tent if needed.
Let cool for 30 minutes and serve warm.
Serve with home made whipped cream if you have extra energy!


- Roasted Vegetables
- Potato Salad
- Bagels
- Mushroom Tart
- Cole Slaw
- Mashed Potatoes
- Sweet Potato Casserole
- Roasted Brussels Sprouts
- Roasted Grapes and Sausage
- Parsnip Puree
- Mashed Cauliflower
- Baked Potato
- Gravy
- Baked Rice with Pomegranate Relish
- Honey Glazed Carrots
- Stuffing
- Corn Pudding
- Corn Bread
- Cranberry Sauce
- Irish Soda Bread
- Sautéed Squash
- Green Bean Casserole